dynamically add remove input fields and submit to database with jquery and laravel. Here, we will show you how to dynamically add or remove input field in form using jQuery, javascript and ajax in laravel. And as well as how to submit this field into the database.
This tutorial will guide you from scratch on how to add or remove dynamically input field in laravel using jquery, ajax and javascript. And also how to validate this field using jQuery and ajax in laravel.
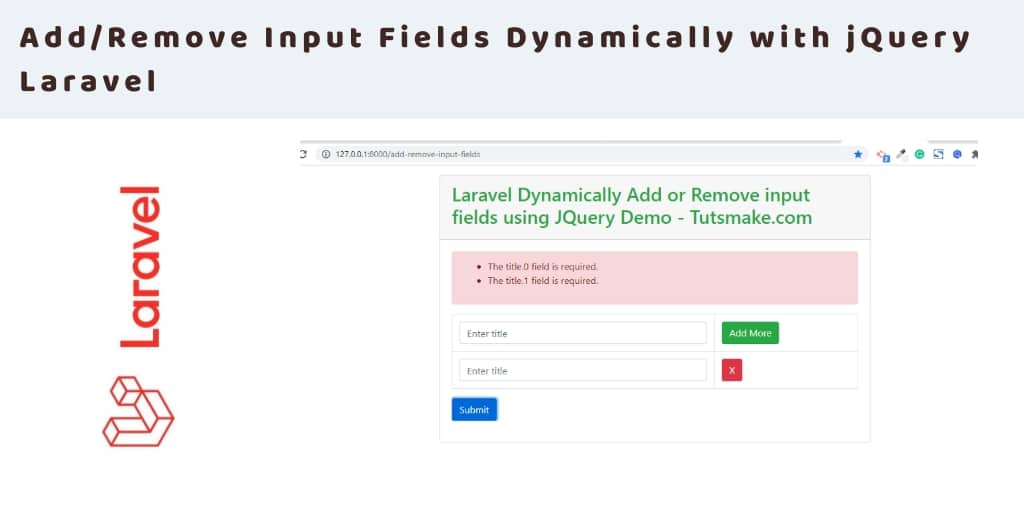
This dynamically add remove input fields and submit to database with jquery and laravel app looks like, you can see the following picture:

Add/remove multiple input fields dynamically with jquery in laravel
Let’s start our laravel Add/remove input fields dynamically with Jquery, javascript, and ajax:
- Step 1: Install Laravel App
- Step 2: Add Database Details
- Step 3: Create Migration & Model
- Step 4: Add Routes
- Step 5: Create Controller by Artisan
- Step 6: Create Blade View
- Step 7: Run Development Server
Step 1: Install Laravel App
First of all, open your terminal and run the following command to install or download laravel app for creating dynamically add remove input fields and submit to database with jquery and laravel app:
cd xampp\htdocs

Then

composer create-project --prefer-dist laravel/laravel Blog
Step 2: Add Database Details
In this step, Navigate to your downloaded dynamically add remove input fields and submit to database with jquery and laravel root directory and open .env file. Then add your database details in .env file, as follow:
 DB_CONNECTION=mysql
 DB_HOST=127.0.0.1
 DB_PORT=3306
 DB_DATABASE=here your database name here
 DB_USERNAME=here database username here
 DB_PASSWORD=here database password here
Step 3: Create Migration & Model
In this step, open a command prompt and run the following command:
php artisan make:model Todo -m
This command will create one model name Todo.php and as well as one migration file for the Todos table.
Then Navigate to database/migrations folder and open create_todos_table.php. Then update the following code into create_todos_table.php:
<?php

use Illuminate\Database\Migrations\Migration;
use Illuminate\Database\Schema\Blueprint;
use Illuminate\Support\Facades\Schema;

class CreateTodosTable extends Migration
{
    /**
     * Run the migrations.
     *
     * @return void
     */
    public function up()
    {
        Schema::create('todos', function (Blueprint $table) {
            $table->id();
            $table->string('title');
            $table->timestamps();
        });
    }

    /**
     * Reverse the migrations.
     *
     * @return void
     */
    public function down()
    {
        Schema::dropIfExists('todos');
    }
}
After that, run the following command to migrate the table into your select database:
php artisan migrate
Step 4: Create Route
In this step, Navigate to the app/routes folder and open web.php file. Then update the following routes into your web.php file:
Route::get('add-remove-input-fields', 'AddRemoveFieldController@index');
Route::post('add-remove-input-fields', 'AddRemoveFieldController@store');
Step 5: Generate Controller by Artisan
In this step, open your terminal and run the following command to create ajax file upload controller file:
php artisan make:controller AddRemoveFieldController
This command will create a controller named AddRemoveFieldController.php file.
Next, Navigate to app/http/controllers/ folder and open AddRemoveFieldController.php. Then add the following file uploading methods into your AddRemoveFieldController.php file:
<?php
namespace App\Http\Controllers;

use Illuminate\Http\Request;

use App\Todo;

use Illuminate\Support\Facades\Validator;

class AddRemoveFieldController extends Controller
{
    public function index()
    {
        return view("add-remove-input-fields");
    }
    public function store(Request $request) {

       $data = [];

        foreach($request->input('title') as $key => $value) {
            $data["title.{$key}"] = 'required';
        }

        $validator = Validator::make($request->all(), $data);

        if ($validator->passes()) {

            foreach($request->input('title') as $key => $value) {
                Todo::create(['title'=>$value]);
            }

            return response()->json(['success'=>'true']);
        }

        return response()->json(['error'=>$validator->errors()->all()]);
  }

}
Step 6: Create Blade View
In this step, create one blade view file named add-remove-input-fields.blade.php.
Now, navigate resources/views and create one file name add-remove-input-fields.blade.php Then update the following code into your add-remove-input-fields.blade.php file:
<!DOCTYPE html>
<html>
<head>
    <title>Laravel Dynamically Add or Remove input fields using JQuery - Tutsmake.com</title>
    <link rel="stylesheet" href="https://stackpath.bootstrapcdn.com/bootstrap/4.5.1/css/bootstrap.min.css">

    <script src="https://code.jquery.com/jquery-3.5.1.min.js"></script>

    <script src="https://stackpath.bootstrapcdn.com/bootstrap/4.5.1/js/bootstrap.min.js"></script>

    <meta name="csrf-token" content="{{ csrf_token() }}">
    <style type="text/css">
      body {
          background-color: #edf2f7;
        }
    </style>
</head>
<body>

<div class="container mt-3">
  <div class="row justify-content-center">
      <div class="col-md-8">
          <div class="card">
              <div class="card-header">
                  <h2 class="text-success">Laravel Dynamically Add or Remove input fields using JQuery Demo - Tutsmake.com</h2>
              </div>
              <div class="card-body">
                  <div class="form-group">
                     <form name="add_name" id="add_name">

                        <div class="alert alert-danger show-error-message" style="display:none">
                        <ul></ul>
                        </div>

                        <div class="alert alert-success show-success-message" style="display:none">
                        <ul></ul>
                        </div>

                        <div class="table-responsive">
                            <table class="table table-bordered" id="dynamic_field">
                                <tr>
                                    <td><input type="text" name="title[]" placeholder="Enter title" class="form-control name_list" / id="title"></td>
                                    <td><button type="button" name="add" id="add" class="btn btn-success">Add More</button></td>
                                </tr>
                            </table>
                            <input type="button" name="submit" id="submit" class="btn btn-primary" value="Submit" />
                        </div>
                     </form>
                  </div>
              </div>
          </div>
      </div>
  </div>
</div>


<script type="text/javascript">
    $(document).ready(function(){
      var url = "{{ url('add-remove-input-fields') }}";
      var i=1;

      $('#add').click(function(){
        var title = $("#title").val();
        i++;
        $('#dynamic_field').append('<tr id="row'+i+'" class="dynamic-added"><td><input type="text" name="title[]" placeholder="Enter title" class="form-control name_list" value="'+title+'" /></td><td><button type="button" name="remove" id="'+i+'" class="btn btn-danger btn_remove">X</button></td></tr>');
      });

      $(document).on('click', '.btn_remove', function(){
           var button_id = $(this).attr("id");
           $('#row'+button_id+'').remove();
      });

      $.ajaxSetup({
          headers: {
            'X-CSRF-TOKEN': $('meta[name="csrf-token"]').attr('content')
          }
      });

      $('#submit').click(function(){
           $.ajax({
                url:"{{ url('add-remove-input-fields') }}",
                method:"POST",
                data:$('#add_name').serialize(),
                type:'json',
                success:function(data)
                {
                    if(data.error){
                        display_error_messages(data.error);
                    }else{
                        i=1;
                        $('.dynamic-added').remove();
                        $('#add_name')[0].reset();
                        $(".show-success-message").find("ul").html('');
                        $(".show-success-message").css('display','block');
                        $(".show-error-message").css('display','none');
                        $(".show-success-message").find("ul").append('<li>Todos Has Been Successfully Inserted.</li>');
                  }
              }
        });
    });

    function display_error_messages(msg) {
        $(".show-error-message").find("ul").html('');
        $(".show-error-message").css('display','block');
        $(".show-success-message").css('display','none');
        $.each( msg, function( key, value ) {
          $(".show-error-message").find("ul").append('<li>'+value+'</li>');
        });
      }
    });

</script>
</body>
</html>
Step 7: Run Development Server
Finally, run the following command to start the development server for your laravel – dynamically add or remove input fields using jquery app:
php artisan serve
Now, open your browser and hit the following URLs into it:
http://localhost:8000/add-remove-input-fields
If you want to remove public or public/index.php from URL In laravel, Click Me
Conclusion
laravel – dynamically add or remove input fields using jquery tutorial, you have learned how to dynamically add or remove input fields using jquery laravel app.
Recommended Laravel Posts
If you have any questions or thoughts to share, use the comment form below to reach us.