If you only want to install MySQL, phpmyadmin and apache web server, without php. So you can do very easily. For this you can use some commands, you can install and configure phpmyadmin, mysql or apache web server as well in ubunut 22.04 system; In this tutorial, we will show you how to install and configure phpmyadmin Apache 2 and MySQL on Ubuntu 22.04 server.
How to Install phpMyAdmin, Apache 2, and MySQL on Ubuntu 22.04
Here some steps to install and configure phpmyadmin Apache 2 and MySQL on Ubuntu 22.04 server.
Step 1 – Update System Dependencies
First upgrade the system, so that all the latest dependency requirements of the Ubuntu package repository are upgraded, and there are no problems with the installation.
sudo apt-get update
sudo apt-get upgrade
Step 2 – Install Apache2 HTTP Server and Configure it
Next, execute the following command on command line or terminal to install apache 2 on ubuntu 22.04 system:
sudo apt-get install apache2
Once the Apache 2 installation has been finished. Now, you need to set up Uncomplicated Firewall (UFW) with Apache 2 to allow public access on default web ports for HTTP and HTTPS
sudo ufw app list
Then you will see all the listed applications.
Output
Available applications:
   Apache
   Apache Full
   Apache Secure
   OpenSSH
- Apache: This profile opens port
80(normal, unencrypted web traffic) - Apache Full: This profile opens both port
80(normal, unencrypted web traffic) and port443(TLS/SSL encrypted traffic) - Apache Secure: This profile opens only port
443(TLS/SSL encrypted traffic) - OpenSSH: This profile opens port
22for SSH access.
If you are not going to use SSL, so you need to enable only the Apache profile. By using the following command, you can enable apache full on ubuntu server:
sudo ufw allow 'Apache Full'
Every process in Apache is managed with the systemctl command. Check the status of Apache 2 with the following command.
sudo systemctl status apache2
Output
● apache2.service - The Apache HTTP Server
     Loaded: loaded (/lib/systemd/system/apache2.service; enabled; vendor preset: enabled)
     Active: active (running) since Fri 2023-04-29 00:34:49 UTC; 2min 52s ago
       Docs: https://httpd.apache.org/docs/2.4/
   Main PID: 12782 (apache2)
      Tasks: 55 (limit: 1151)
     Memory: 5.1M
        CPU: 52ms
     CGroup: /system.slice/apache2.service
             ├─12782 /usr/sbin/apache2 -k start
             ├─12784 /usr/sbin/apache2 -k start
             └─12785 /usr/sbin/apache2 -k start
Step 3 – Install MySQL Server and Configure it
Once you have installed Apache 2 on Ubuntu server. Next, you need to install and configure mysql on ubuntu 22.04.
So, execute the following command on the terminal or command line to install MySQL server on ubuntu server with Apache 2:
sudo apt-get install mysql-server
During the installation process, you’ll be prompted to set a password for the MySQL root user. Make sure to choose a strong password and remember it.
To secure your MySQL installation, execute the following command and follow the prompts:
sudo mysql_secure_installation
Once you have executed this command. Then the questions given below in the prompt will appear:
- You will be presented with a screen where MySQL asks whether you would like to activate the VALIDATE PASSWORD PLUGIN. For now, keeping things simple, type no.
- In the next type the root password of your choice. Confirm it again.
- In the next screen MySql will ask whether to remove anonymous users. Type yes
- Disallow root login remotely? Type No
- Remove test database and access to it? Type Yes
- Reload privilege tables now? Type Yes
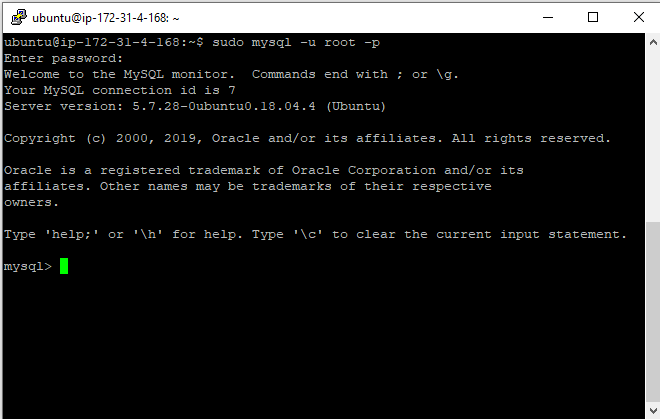
If you want to check whether MySQL is working correctly by logging into the database, so you can execute the following command on terminal:
sudo mysql -u root -p
This command will ask for the password. Please Enter the password that you enter while securing the MySQL and hit enter will log in into MySQL:
Now, Type exit on ssh terminal to get out of MySql:
exit
Step 4 – Install PhpMyAdmin and Configure it
Execute the following command on the terminal or command line to install PHPmyadmin on the ubuntu apache 2 server:
sudo apt-get install phpmyadmin
During the installation process, you’ll be prompted to choose a web server. Select apache2 and press Enter.
You’ll also be asked if you want to configure the database for phpmyadmin with dbconfig-common. Choose Yes.
Next, you’ll be prompted to set a password for the phpMyAdmin database user. This should be a separate password from the MySQL root password. Choose a strong password and remember it.
By default, phpMyAdmin is not accessible from the web. We’ll create a symbolic link for phpMyAdmin in the Apache web directory to make it accessible.
sudo ln -s /etc/phpmyadmin/apache.conf /etc/apache2/conf-available/phpmyadmin.conf
sudo a2enconf phpmyadmin
sudo systemctl reload apache2
Next, execute the following command on the terminal to login into your MySQL server:
sudo mysql -u root -p
Next, execute the following query on the terminal to allow root access login into your MySQL using PHPMyAdmin:
ALTER USER 'root'@'localhost' IDENTIFIED WITH mysql_native_password BY 'password';
Note that, Replace the password with the root password you entered while installing MySql.
Next, execute the following query to flush privileges for your root user:
FLUSH PRIVILEGES;
Finally, Execute the following command on the terminal to restart Apache 2 server:
sudo service apache2 restart
Here is the video tutorial for install phpmyadmin apache2 and mysql on ubuntu 22.04:
Conclusion
Congratulations! You have successfully installed phpMyAdmin, Apache 2, and MySQL on your Ubuntu 22.04 server. You can now efficiently manage your MySQL databases using the user-friendly web interface provided by phpMyAdmin.