Login with Facebook in Laravel 9 apps; In this tutorial, we will learn how to integrate Facebook login in laravel 9 app using socialite package.
If you do not know how to make apps on Facebook Developer Console. So you can make an app in the Facebook Developer Console by following the steps given below:
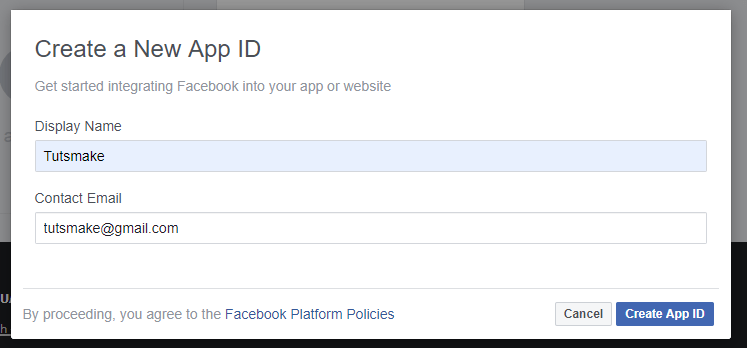
Step 1 – Visit the following url https://developers.facebook.com/apps/ and create a new facebook app.
Step 2 – Create facebook app with email and app name look like below picture:
Step 3 – Then, Navigate to setting->advanced and add redirect URL, looks like below picture:

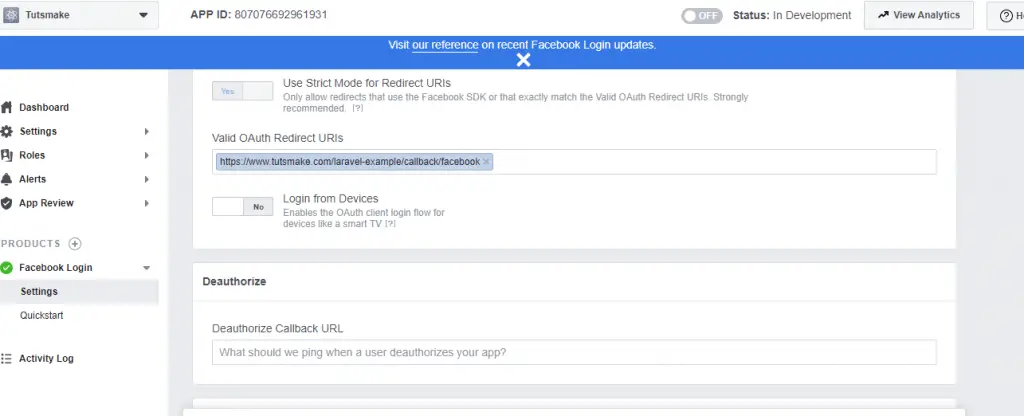
Step 4 – Now, add valid auth redirect url. So, click facebook login->setting and add valid auth redirect URL, looks like below picture:
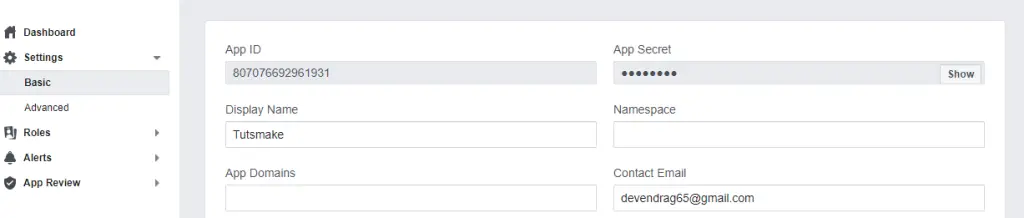
Step 5 – Finally, Navigate to facebook developers dashboard and copy the following App ID and App SECRET, looks like below picture:
How to Login with Facebook Account In Laravel 9
Use the following steps to implement facebook login in laravel 9 apps:
- Step 1 – Install Laravel 9 App
- Step 2 – Configure Database With App
- Step 3 – Configure Facebook App
- Step 4 – Install Socialite & Configure
- Step 5 – Add Field In Table Using Migration
- Step 6 – Install Jetstream Auth
- Step 7 – Build Routes
- Step 8 – Create Facebook Login Controller By Command
- Step 9 – Integrate FB Login Button In Login Page
- Step 10 – Start Development Server
Step 1 – Install Laravel 9 App
In this step, open your terminal and navigate to the local webserver directory. Then type the following command on the terminal to download laravel 9 app:
composer create-project --prefer-dist laravel/laravel LaravelfbLogin
Step 2 – Configure Database With App
The next step, navigate to the root directory of the download laravel app. And open .env file. Then configure database details like the following:
 DB_CONNECTION=mysql
 DB_HOST=127.0.0.1
 DB_PORT=3306
 DB_DATABASE=here your database name here
 DB_USERNAME=here database username here
 DB_PASSWORD=here database password here
Step 3 – Configure Facebook App
In this step, configure facebook app with this laravel app. So, open your laravel facebook social login project in any text editor. Then navigate the config directory and open service.php file and add the client id, secret and callback url:
 'facebook' => [
    'client_id' => 'xxxx',
    'client_secret' => 'xxx',
    'redirect' => 'http://127.0.0.1:8000/callback/facebook',
  ],
Step 4 – Install Socialite & Configure
In this step, use the following command to install socialite package in laravel app:
composer require laravel/socialite
After that, configure this package in app.php file, so go to config directory and open app.php file.
Then Add the ServiceProvider in config/app.php:
'providers' => [
    /*
     * Package Service Providers...
     */
    Laravel\Socialite\SocialiteServiceProvider::class,
]
Then add the Facade in config/app.php:
'aliases' => [
    ...
    'Socialite' => Laravel\Socialite\Facades\Socialite::class,
]
Step 5 – Add Field In Table Using Migration
In this step, use the following command to create migration file for add column in database table:
php artisan make:migration add_social_login_field
After that, open the add_social_login_field.php file, which is found inside database/migration directory and add the following code into it:
<?php

use Illuminate\Support\Facades\Schema;
use Illuminate\Database\Schema\Blueprint;
use Illuminate\Database\Migrations\Migration;

class AddSoicalLoginField extends Migration
{
    /**
     * Run the migrations.
     *
     * @return void
     */
    public function up()
    {
        Schema::table('users', function ($table) {
            $table->string('social_id')->nullable();
            $table->string('social_type')->nullable();
        });
    }

    /**
     * Reverse the migrations.
     *
     * @return void
     */
    public function down()
    {
        Schema::table('users', function ($table) {
            $table->dropColumn('social_id');
           $table->dropColumn('social_type');
         });
    }
}
After successfully add field in database table. Then add fillable property in User.php model, which is found inside app/Models/ directory:
<?php

namespace App\Models;

use Illuminate\Contracts\Auth\MustVerifyEmail;
use Illuminate\Database\Eloquent\Factories\HasFactory;
use Illuminate\Foundation\Auth\User as Authenticatable;
use Illuminate\Notifications\Notifiable;
use Laravel\Fortify\TwoFactorAuthenticatable;
use Laravel\Jetstream\HasProfilePhoto;
use Laravel\Sanctum\HasApiTokens;

class User extends Authenticatable
{
    use HasApiTokens;
    use HasFactory;
    use HasProfilePhoto;
    use Notifiable;
    use TwoFactorAuthenticatable;

    /**
     * The attributes that are mass assignable.
     *
     * @var array
     */
    protected $fillable = [
        'name',
        'email',
        'password',
        'social_id',
        'social_type'
    ];

    /**
     * The attributes that should be hidden for arrays.
     *
     * @var array
     */
    protected $hidden = [
        'password',
        'remember_token',
        'two_factor_recovery_codes',
        'two_factor_secret',
    ];

    /**
     * The attributes that should be cast to native types.
     *
     * @var array
     */
    protected $casts = [
        'email_verified_at' => 'datetime',
    ];

    /**
     * The accessors to append to the model's array form.
     *
     * @var array
     */
    protected $appends = [
        'profile_photo_url',
    ];
}
After that, execute the following command on cmd to create tables into your selected database:
php artisan migrate
Step 6 – Install Jetstream Auth
In this step, install the jetstream laravel auth scaffolding package with livewire. We have provided a complete guide in this Laravel 9 Auth Scaffolding using Jetstream Tutorial.
Step 7 – Build Routes
In this step, Go to the routes directory and open the web.php file. Then add the following routes into the web.php file:
use Illuminate\Support\Facades\Route;
use App\Http\Controllers\Auth\FacebookSocialiteController;


Route::get('auth/facebook', [FacebookSocialiteController::class, 'redirectToFB']);
Route::get('callback/facebook', [FacebookSocialiteController::class, 'handleCallback']);
Step 8 – Create Facebook Login Controller By Command
In this step, Execute the following command on the terminal to create the FacebookSocialiteController.php file:
php artisan make:controller FacebookSocialiteController
After that, Go to app/HTTP/controllers directory and open the FacebookSocialiteController.php file in any text editor. Then add the following code into the FacebookSocialiteController.php file:
<?php

namespace App\Http\Controllers\Auth;

use App\Http\Controllers\Controller;
use Socialite;
use Auth;
use Exception;
use App\Models\User;

class FacebookSocialiteController extends Controller
{
    /**
     * Create a new controller instance.
     *
     * @return void
     */
    public function redirectToFB()
    {
        return Socialite::driver('facebook')->redirect();
    }

    /**
     * Create a new controller instance.
     *
     * @return void
     */
    public function handleCallback()
    {
        try {

            $user = Socialite::driver('facebook')->user();

            $finduser = User::where('social_id', $user->id)->first();

            if($finduser){

                Auth::login($finduser);

                return redirect('/home');

            }else{
                $newUser = User::create([
                    'name' => $user->name,
                    'email' => $user->email,
                    'social_id'=> $user->id,
                    'social_type'=> 'facebook',
                    'password' => encrypt('my-facebook')
                ]);

                Auth::login($newUser);

                return redirect('/home');
            }

        } catch (Exception $e) {
            dd($e->getMessage());
        }
    }
}
Step 9 – Integrate FB Login Button In Login Page
In this step, integrate the Facebook login button into the login.blade.php file. So, open login.blade.php, which is found inside resources/views/auth/ directory:
<x-guest-layout>
    <x-jet-authentication-card>
        <x-slot name="logo">
            <x-jet-authentication-card-logo />
        </x-slot>

        <x-jet-validation-errors class="mb-4" />

        @if (session('status'))
            <div class="mb-4 font-medium text-sm text-green-600">
                {{ session('status') }}
            </div>
        @endif

        <form method="POST" action="{{ route('login') }}">
            @csrf

            <div>
                <x-jet-label value="{{ __('Email') }}" />
                <x-jet-input class="block mt-1 w-full" type="email" name="email" :value="old('email')" required autofocus />
            </div>

            <div class="mt-4">
                <x-jet-label value="{{ __('Password') }}" />
                <x-jet-input class="block mt-1 w-full" type="password" name="password" required autocomplete="current-password" />
            </div>

            <div class="block mt-4">
                <label class="flex items-center">
                    <input type="checkbox" class="form-checkbox" name="remember">
                    <span class="ml-2 text-sm text-gray-600">{{ __('Remember me') }}</span>
                </label>
            </div>

            <div class="flex items-center justify-end mt-4">
                @if (Route::has('password.request'))
                    <a class="underline text-sm text-gray-600 hover:text-gray-900" href="{{ route('password.request') }}">
                        {{ __('Forgot your password?') }}
                    </a>
                @endif

                <x-jet-button class="ml-4">
                    {{ __('Login') }}
                </x-jet-button>

                <a href="{{ url('auth/faebook') }}" style="margin-top: 0px !important;background: green;color: #ffffff;padding: 5px;border-radius:7px;" class="ml-2">
                  <strong>Facebook Login</strong>
                </a>
            </div>
        </form>
    </x-jet-authentication-card>
</x-guest-layout>
Step 10 – Start Development Server
In this step, start the development server by executing the PHP artisan serve command on the terminal:
php artisan serve
Now open the browser and hit the following URLs on it:
http://127.0.0.1:8000