
Node js + MongoDB user login and registration form example. In this tutorial, you will learn how to create user registration and login authentication application using node js + express js + MongoDB database.
Node js Express Login and Registration with MongoDB
Follow the following steps and create login and registration system in node js + express + MongoDB database:
- Step 1 – Install Node JS Express App and Modules
- Step 2 – Connect Node Express Js App with MongoDB
- Step 3 – Create Model
- Step 4 – Import Modules and Create routes in app.js
- Step 5 – Create Login & Registration Views
- Step 6 – Start Development Server
Step 1 – Install Node JS Express App and Modules
Execute the following command on terminal to create new directory for node js login and registration system with mongodb:
express --view=ejs myApp
Then execute the following command to enter your myApp app directories, So open your cmd and run the following command:
cd myApp
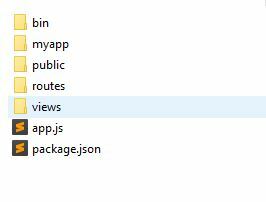
Your node express js app structure looks like:
Install some required node module; so open again your cmd and run the following commands:
 npm install
 npm install express-flash --save
 npm install express-session --save
 npm install mongoose
 npm install passport passport-local --save
 npm install passport-local-mongoose --save
 npm install body-parser --save
Flash is an extension of connect-flash with the ability to define a flash message and render it without redirecting the request.
Express.js uses a cookie to store a session id.
Body-parser allows express to read the body and then parse that into a JSON object that we can understand.
Passport is authentication middleware for Node. js. Extremely flexible and modular, Passport can be unobtrusively dropped in to any Express-based web application. A comprehensive set of strategies support authentication using a username and password, Facebook, Twitter, and more.
Mongoose is an Object Data Modeling (ODM) library for MongoDB and Node.js. It manages relationships between data, provides schema validation, and is used to translate between objects in code and the representation of those objects in MongoDB.
Step 2 – Connect Node js Express with MongoDB
Create a new file name database.js; so visit your app root directory and create new file name database.js. Then add the following code into to connect node js express app with mongoDB database:
var mongoose = require('mongoose');
mongoose.connect('mongodb://localhost/node-mongodb', {useNewUrlParser: true});
var conn = mongoose.connection;
conn.on('connected', function() {
    console.log('database is connected successfully');
});
conn.on('disconnected',function(){
    console.log('database is disconnected successfully');
})
conn.on('error', console.error.bind(console, 'connection error:'));
module.exports = conn;
Step 3 – Create Model
Create model; so visit your app directory and create directory name Models. And inside this directory; create a userModel.js file and then add the following codes into it:
Prior to version 5, Mongoose had a separate default export for Schema and it was required in the following way:
var mongoose = require('mongoose');
var Schema = mongoose.Schema;

var userSchema = new Schema({
    name: String,
    email: String,
    password: String
});

var User = mongoose.model('User', userSchema);
However, with version 5 and above, the Schema constructor is now exported directly and you should require it in the following way:
var mongoose = require('mongoose');

var userSchema = new mongoose.Schema({
    name: String,
    email: String,
    password: String
});

var User = mongoose.model('User', userSchema);
Step 4 – Import Modules and Create routes in app.js
Import modules and create login and registration routes in app.js file; So visit your app root directory and open app.js file in any text editor; then add the following code into it:
var express = require("express");
var mongoose = require("mongoose");
var passport = require("passport");
var bodyParser = require("body-parser");
var LocalStrategy = require("passport-local");
var passportLocalMongoose = require("passport-local-mongoose");
var User = require("./models/userModel");


var app = express();
app.set("view engine", "ejs");
app.use(bodyParser.urlencoded({ extended: true }));

app.use(require("express-session")({
    secret: "node js mongodb",
    resave: false,
    saveUninitialized: false
}));

app.use(passport.initialize());
app.use(passport.session());

passport.use(new LocalStrategy(User.authenticate()));
passport.serializeUser(User.serializeUser());
passport.deserializeUser(User.deserializeUser());

//=====================
// ROUTES
//=====================

// Showing home page
app.get("/", function (req, res) {
    res.render('register', {
    title: 'Registration Page',
    name: '',
    email: '',
    password: ''
  })
});

// Showing secret page
app.get("/home", isLoggedIn, function (req, res) {
    res.render("home");
});

// Showing register form
app.get("/register", function (req, res) {
    res.render('register', {
    title: 'Registration Page',
    name: '',
    email: '',
    password: ''
  })
});

// Handling user signup
app.post("/register", function (req, res) {
    var email = req.body.email
    var password = req.body.password
    User.register(new User({ email: email }),
            password, function (err, user) {
        if (err) {
            console.log(err);
            return res.render("register");
        }

        passport.authenticate("local")(
            req, res, function () {
            req.flash('success', 'You have logged in')
            res.render("home");
        });
    });
});

//Showing login form
app.get("/login", function (req, res) {
     res.render('login', {
        title: 'Login',
        email: '',
        password: ''
    })
});

//Handling user login
app.post("/login", passport.authenticate("local", {
    successRedirect: "/home",
    failureRedirect: "/login"
}), function (req, res) {
});

//Handling user logout
app.get("/logout", function (req, res) {
    req.logout();
    res.redirect("/");
});

function isLoggedIn(req, res, next) {
    if (req.isAuthenticated()) return next();
    res.redirect("/login");
}

var port = process.env.PORT || 3000;
app.listen(port, function () {
    console.log("Server Has Started!");
});
Step 5: Create Login and Registration Views
Create login and registration views; so visit the views directory and create the following views file into it:
- login.ejs
- register.ejs
- home.ejs
Now, open your login.ejs file and update the following code into your file:
<!DOCTYPE html>
<html>
<head>
  <title><%= title %></title>
  <script src="https://code.jquery.com/jquery-3.4.1.min.js"></script>

  <script src="https://cdnjs.cloudflare.com/ajax/libs/popper.js/1.14.3/umd/popper.min.js"></script>

  <script src="https://stackpath.bootstrapcdn.com/bootstrap/4.1.3/js/bootstrap.min.js"></script>

  <link rel="stylesheet" href="https://stackpath.bootstrapcdn.com/bootstrap/4.1.3/css/bootstrap.min.css">
</head>
<body>
  <% if (messages.error) { %>
  <p style="color:red"><%- messages.error %></p>
  <% } %>

  <% if (messages.success) { %>
      <p style="color:green"><%- messages.success %></p>
  <% } %>
  <form action="/login" method="post" name="form1">

    <div class="form-group">
      <label for="exampleInputEmail1">Email</label>
      <input type="email" name="email" class="form-control" id="email" aria-describedby="emailHelp" placeholder="Enter email" value="">
    </div>

    <div class="form-group">
      <label for="exampleInputEmail1">Password</label>
      <input type="password" name="password" class="form-control" id="password" aria-describedby="emailHelp" placeholder="*********" value="">
    </div>

    <input type="submit" class="btn btn-primary" value="Add">
    <a href="auth/register" class="btn btn-success ml-2">Register Here</a>
  </form>
</body>
</html>
Now, open your register.ejs file and update the following code into your file:
<!DOCTYPE html>
<html>
<head>
  <title><%= title %></title>
  <script src="https://code.jquery.com/jquery-3.4.1.min.js"></script>

  <script src="https://cdnjs.cloudflare.com/ajax/libs/popper.js/1.14.3/umd/popper.min.js"></script>

  <script src="https://stackpath.bootstrapcdn.com/bootstrap/4.1.3/js/bootstrap.min.js"></script>

  <link rel="stylesheet" href="https://stackpath.bootstrapcdn.com/bootstrap/4.1.3/css/bootstrap.min.css">
</head>
<body>
  <% if (messages.error) { %>
  <p style="color:red"><%- messages.error %></p>
  <% } %>

  <% if (messages.success) { %>
      <p style="color:green"><%- messages.success %></p>
  <% } %>
  <form action="/register" method="post" name="form1">

    <div class="form-group">
      <label for="exampleInputEmail1">Name</label>
      <input type="name" name="name" class="form-control" id="name" aria-describedby="nameHelp" placeholder="Enter name" value="">
    </div>

    <div class="form-group">
      <label for="exampleInputEmail1">Email</label>
      <input type="email" name="email" class="form-control" id="email" aria-describedby="emailHelp" placeholder="Enter email" value="">
    </div>

    <div class="form-group">
      <label for="exampleInputEmail1">Password</label>
      <input type="password" name="password" class="form-control" id="password" aria-describedby="emailHelp" placeholder="*********" value="">
    </div>

    <input type="submit" class="btn btn-primary" value="Add">
    <a href="auth/login" class="btn btn-success ml-2">Login</a>
  </form>
</body>
</html>
This login.ejs file contains login form.
Next, open your home.ejs file and update the following code into your file:
<!DOCTYPE html>
<html>
<head>
  <title><%= title %></title>

  <script src="https://code.jquery.com/jquery-3.4.1.min.js"></script>

  <script src="https://cdnjs.cloudflare.com/ajax/libs/popper.js/1.14.3/umd/popper.min.js"></script>

  <script src="https://stackpath.bootstrapcdn.com/bootstrap/4.1.3/js/bootstrap.min.js"></script>

  <link rel="stylesheet" href="https://stackpath.bootstrapcdn.com/bootstrap/4.1.3/css/bootstrap.min.css">
</head>
<body>
  <div class="container">

  <% if (messages.error) { %>
  <p style="color:red"><%- messages.error %></p>
  <% } %>

  <% if (messages.success) { %>
      <p style="color:green"><%- messages.success %></p>
  <% } %>

  <div class="card">
    <div class="card-header">
     Dashboard <b><%= name %></b>
    </div>
    <div class="card-body">
      <h5 class="card-title">Welcome</h5>
      <p class="card-text">You have successfully login</p>
      <a href="logout" class="btn btn-primary">Logout</a>
    </div>
  </div>

  </div>
</body>
</html>
Step 6: Run Development Server
You can use the following command to run development server:
//run the below command

npm start

after run this command open your browser and hit

http://127.0.0.1:3000/
Conclusion
Node js + MongoDB user login and registration form example. In this tutorial, you have learn how to create user registration and login authentication application using node js + express js + MongoDB database.
Thanks! This really helped !