In this tutorial, we will show you how to build user authentication (registration and login) APIs in node.js express and mysql with jwt bcrypt.
Node js user Authentication using MySQL and Express js JWT
Steps to build restful apis with node js express and mysql authentication with jwt
Step 1 – Create a Database And Table
Run the following command on cmd to create a database and table:
CREATE DATABASE node-app
CREATE TABLE users (
  id int(11) NOT NULL AUTO_INCREMENT,
  name varchar(50) COLLATE utf8mb4_unicode_ci NOT NULL,
  email varchar(50) COLLATE utf8mb4_unicode_ci NOT NULL,
  password varchar(200) COLLATE utf8mb4_unicode_ci NOT NULL,
  PRIMARY KEY (id),
  UNIQUE KEY email (email)
 ) ENGINE=InnoDB AUTO_INCREMENT=4 DEFAULT CHARSET=utf8mb4 COLLATE=utf8mb4_unicode_ci;
Step 2 – Create Node Express js App
Run the following command on cmd to create the node js app:
mkdir nodejs-auth-rest-api-mysql

cd nodejs-auth-rest-api-mysql

npm init -y
Step 3 – Connect the App to the Database
Create dbConnection.js file into your app root directory, and add the following code into it:
var mysql = require('mysql');
var conn = mysql.createConnection({
  host: 'localhost', // Replace with your host name
  user: 'root',      // Replace with your database username
  password: '',      // Replace with your database password
  database: 'my-node' // // Replace with your database Name
});
conn.connect(function(err) {
  if (err) throw err;
  console.log('Database is connected successfully !');
});
module.exports = conn;
Step 4 – Install express and required Modules
Run the following command on cmd to install express express-validator mysql body-parser jsonwebtoken bcryptjs cors into your node js express app:
npm install express express-validator mysql body-parser jsonwebtoken bcryptjs cors --save
Step 5 – Create Server.js File
Create server.js file and import express express-validator mysql body-parser jsonwebtoken bcryptjs cors into your server.js file; as shown below:
const createError = require('http-errors');
const express = require('express');
const path = require('path');
const bodyParser = require('body-parser');
const cors = require('cors');
const indexRouter = require('./router.js');
const app = express();
app.use(express.json());
app.use(bodyParser.json());
app.use(bodyParser.urlencoded({
    extended: true
}));
app.use(cors());
app.use('/api', indexRouter);
// Handling Errors
app.use((err, req, res, next) => {
    // console.log(err);
    err.statusCode = err.statusCode || 500;
    err.message = err.message || "Internal Server Error";
    res.status(err.statusCode).json({
      message: err.message,
    });
});
app.listen(3000,() => console.log('Server is running on port 3000'));
Step 6 – Create Validation.js and Router.js
Create validation.js and router.js in root directory of project.
Add the following code to your validation.js file:
const { check } = require('express-validator');
exports.signupValidation = [
    check('name', 'Name is requied').not().isEmpty(),
    check('email', 'Please include a valid email').isEmail().normalizeEmail({ gmail_remove_dots: true }),
    check('password', 'Password must be 6 or more characters').isLength({ min: 6 })
]
exports.loginValidation = [
     check('email', 'Please include a valid email').isEmail().normalizeEmail({ gmail_remove_dots: true }),
     check('password', 'Password must be 6 or more characters').isLength({ min: 6 })
]
Then add the following code into your router.js file:
const express = require('express');
const router = express.Router();
const db  = require('./dbConnection');
const { signupValidation, loginValidation } = require('./validation');
const { validationResult } = require('express-validator');
const bcrypt = require('bcryptjs');
const jwt = require('jsonwebtoken');
router.post('/register', signupValidation, (req, res, next) => {
  db.query(
    `SELECT * FROM users WHERE LOWER(email) = LOWER(${db.escape(
      req.body.email
    )});`,
    (err, result) => {
      if (result.length) {
        return res.status(409).send({
          msg: 'This user is already in use!'
        });
      } else {
        // username is available
        bcrypt.hash(req.body.password, 10, (err, hash) => {
          if (err) {
            return res.status(500).send({
              msg: err
            });
          } else {
            // has hashed pw => add to database
            db.query(
              `INSERT INTO users (name, email, password) VALUES ('${req.body.name}', ${db.escape(
                req.body.email
              )}, ${db.escape(hash)})`,
              (err, result) => {
                if (err) {
                  throw err;
                  return res.status(400).send({
                    msg: err
                  });
                }
                return res.status(201).send({
                  msg: 'The user has been registerd with us!'
                });
              }
            );
          }
        });
      }
    }
  );
});
router.post('/login', loginValidation, (req, res, next) => {
  db.query(
    `SELECT * FROM users WHERE email = ${db.escape(req.body.email)};`,
    (err, result) => {
      // user does not exists
      if (err) {
        throw err;
        return res.status(400).send({
          msg: err
        });
      }
      if (!result.length) {
        return res.status(401).send({
          msg: 'Email or password is incorrect!'
        });
      }
      // check password
      bcrypt.compare(
        req.body.password,
        result[0]['password'],
        (bErr, bResult) => {
          // wrong password
          if (bErr) {
            throw bErr;
            return res.status(401).send({
              msg: 'Email or password is incorrect!'
            });
          }
          if (bResult) {
            const token = jwt.sign({id:result[0].id},'the-super-strong-secrect',{ expiresIn: '1h' });
            db.query(
              `UPDATE users SET last_login = now() WHERE id = '${result[0].id}'`
            );
            return res.status(200).send({
              msg: 'Logged in!',
              token,
              user: result[0]
            });
          }
          return res.status(401).send({
            msg: 'Username or password is incorrect!'
          });
        }
      );
    }
  );
});
router.post('/get-user', signupValidation, (req, res, next) => {
    if(
        !req.headers.authorization ||
        !req.headers.authorization.startsWith('Bearer') ||
        !req.headers.authorization.split(' ')[1]
    ){
        return res.status(422).json({
            message: "Please provide the token",
        });
    }
    const theToken = req.headers.authorization.split(' ')[1];
    const decoded = jwt.verify(theToken, 'the-super-strong-secrect');
    db.query('SELECT * FROM users where id=?', decoded.id, function (error, results, fields) {
        if (error) throw error;
        return res.send({ error: false, data: results[0], message: 'Fetch Successfully.' });
    });
});
module.exports = router;
The router.js file has been contained three routes; as shown below:
- register route – When you call this route on postman with data; it method will store user data into database.
- login route – When you cal this route on postman app with email and password; it will return jwt token. Which is used to call get-user method.
- get-user route – This route will required jwt token; when you call it, you need to pass jwt token. So it will return logged user data.
Step 7 – Test Application
Run the following command on cmd to start node express js server:
//run the below command

nodemon server.js

after run this command open your browser and hit

http://127.0.0.1:3000/api/register
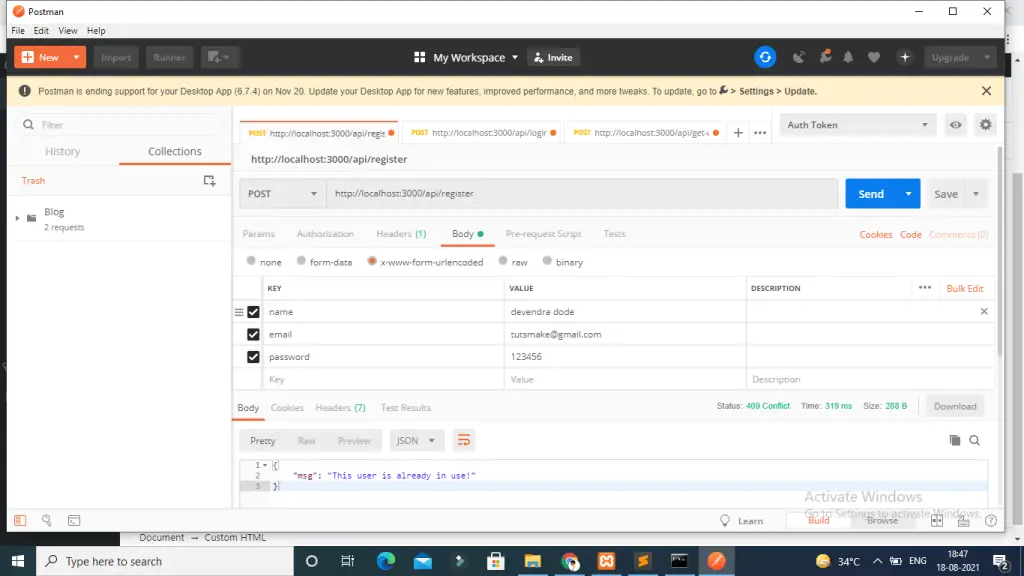
Test node js experss + mysql user registration api with Postman app:
POST - http://localhost:3000/api/register
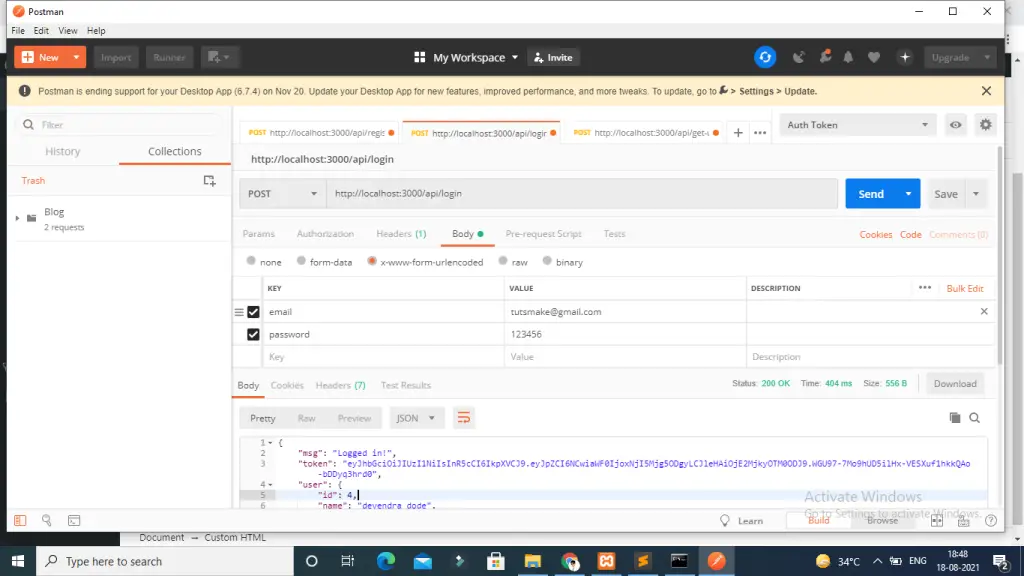
Test node js experss + mysql user login api with Postman app:
POST - http://localhost:3000/api/login
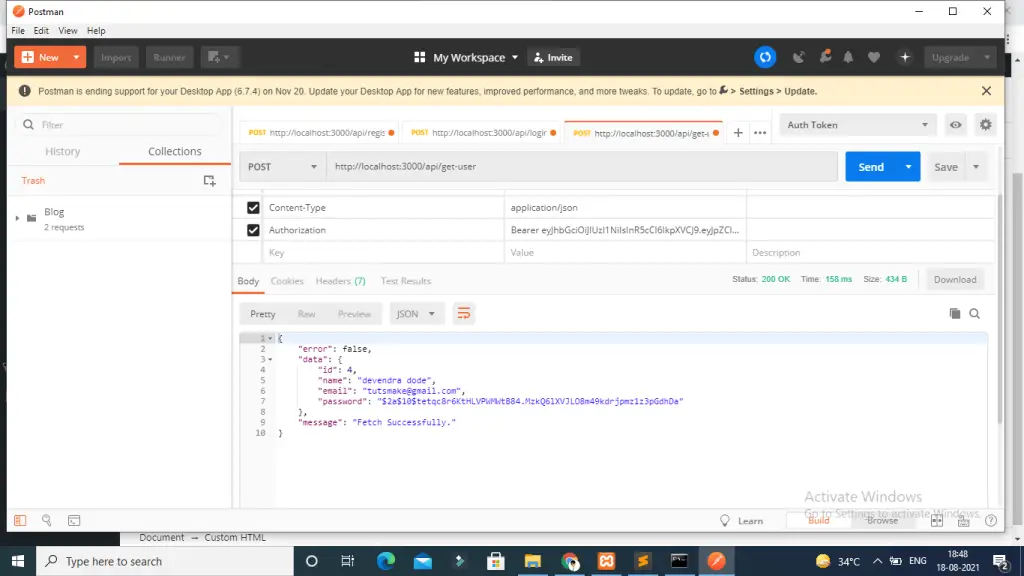
Test node js experss + mysql get user data api with Postman app:
POST - http://localhost:3000/api/get-user
Conclusion
That’s it, you have learned how to build restful apis with node js express and mysql authentication with jwt.
This tutorial is helpful
thank you,
I learnt a lot,
i used postgresql instead of mysql