If you want to create login system by integrating Twitter Auth in Laravel web application. So, through this tutorial, you will learn how to create a twitter login in Laravel 10 applications.
Laravel 10 Socialite Login with Twitter Account Example
By using the following steps, you can add twitter social login auth in Laravel 10 applications:
- Step 1: Install Laravel 10 Setup
- Step 2: Connecting Database to Laravel App
- Step 3: Install Socialite Login Package
- Step 4: Create Twitter App
- Step 5: Add Code In Model and Migration
- Step 6: Add Routes for Twitter App
- Step 7: Create Controller & Methods
- Step 8: Install Laravel Livewire and Jetstream Packages
- Step 9: Update Login View
- Step 10: Run Development Server
Step 1: Install Laravel 10 Setup
First of all, Open your terminal or command prompt.
Then execute the following into it to install or download a fresh Laravel setup:
composer create-project --prefer-dist laravel/laravel blog
Step 2: Connecting Database to Laravel App
In this step, Go to your project root direcotry and open .env file. Then add database details as follow:
 DB_CONNECTION=mysql
 DB_HOST=127.0.0.1
 DB_PORT=3306
 DB_DATABASE=here your database name here
 DB_USERNAME=here database username here
 DB_PASSWORD=here database password here
Step 3: Install Socialite Login Package
In this step, install the socialite package using the below command:
composer require laravel/socialite
Then configure this package in app.php file. So go to config directory and app.php. Then add the following code into app.php file:
'providers' => [
     // Other service providers…
 Laravel\Socialite\SocialiteServiceProvider::class,
],

'aliases' => [
// Other aliases…
'Socialite' => Laravel\Socialite\Facades\Socialite::class,
],
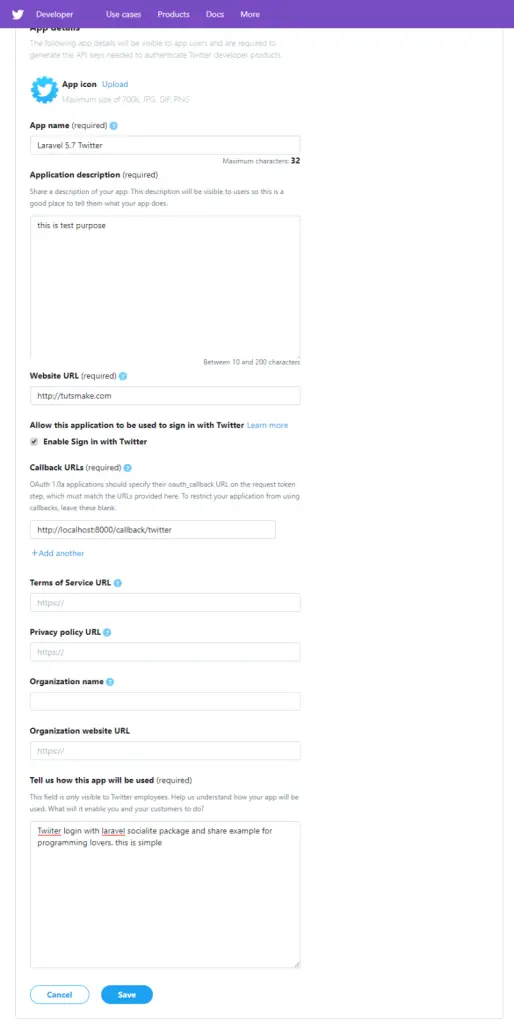
Step 4: Create Twitter App
Now, click this link => https://apps.twitter.com/ and create a new twitter app.
When you click the above link, the following below page will see. Now fill the form shown in the below picture. And submit it:
After successfully created twitter app. It will redirect to dashboard. Where you can get client id and secret for your laravel twitter login app:
After successfully create an app in twitter and get credentials from twitter dashboard, Set client id and client secret config/service.php file :
'twitter' => [
     'client_id' => 'your client id',
     'client_secret' => 'your client secret',
     'redirect' => 'http://localhost:8000/callback/twitter',
 ],
Step 5: Add Code In Model and Migration
In this step, Go to app/Model/User.php and set fillable property put the below code here :
<?php

namespace App\Models;

use Illuminate\Contracts\Auth\MustVerifyEmail;
use Illuminate\Database\Eloquent\Factories\HasFactory;
use Illuminate\Foundation\Auth\User as Authenticatable;
use Illuminate\Notifications\Notifiable;
use Laravel\Fortify\TwoFactorAuthenticatable;
use Laravel\Jetstream\HasProfilePhoto;
use Laravel\Sanctum\HasApiTokens;

class User extends Authenticatable
{
    use HasApiTokens;
    use HasFactory;
    use HasProfilePhoto;
    use Notifiable;
    use TwoFactorAuthenticatable;

    /**
     * The attributes that are mass assignable.
     *
     * @var array
     */
    protected $fillable = [
        'name',
        'email',
        'password',
        'twitter_id',
        'oauth_type',
    ];

    /**
     * The attributes that should be hidden for arrays.
     *
     * @var array
     */
    protected $hidden = [
        'password',
        'remember_token',
        'two_factor_recovery_codes',
        'two_factor_secret',
    ];

    /**
     * The attributes that should be cast to native types.
     *
     * @var array
     */
    protected $casts = [
        'email_verified_at' => 'datetime',
    ];

    /**
     * The accessors to append to the model's array form.
     *
     * @var array
     */
    protected $appends = [
        'profile_photo_url',
    ];
}
Next step, Go to app/database/create_users_table.php and put the below code here :
<?php

use Illuminate\Support\Facades\Schema;
use Illuminate\Database\Schema\Blueprint;
use Illuminate\Database\Migrations\Migration;

class CreateUsersTable extends Migration
{
    /**
     * Run the migrations.
     *
     * @return void
     */
    public function up()
    {
        Schema::create('users', function (Blueprint $table) {
            $table->increments('id');
            $table->string('name');
            $table->string('email')->unique()->nullable();
            $table->string('provider');
            $table->string('provider_id');
            $table->timestamp('email_verified_at')->nullable();
            $table->string('password')->nullable();
            $table->rememberToken()->nullable();
            $table->timestamps();
        });
    }

    /**
     * Reverse the migrations.
     *
     * @return void
     */
    public function down()
    {
        Schema::dropIfExists('users');
    }
}
Step 6: Add Routes for Twitter App
In this step, you need to routes in the web.php file. Go to /routes/web.php file update the following routes into it:
<?php

use Illuminate\Support\Facades\Route;
use App\Http\Controllers\TwitterController;

/*
|--------------------------------------------------------------------------
| Web Routes
|--------------------------------------------------------------------------
*/

Route::get('auth/twitter', [TwitterController::class, 'loginwithTwitter']);
Route::get('auth/callback/twitter', [TwitterController::class, 'cbTwitter']);
Step 7: Create Controller
Open your command prompt and run the following command to create a controller name TwitterSocialController.php file:
php artisan make:controllerTwitterSocialController
Then navigate to app/http/controllers directory and open TwitterSocialController.php file. And update the following code in TwitterSocialController.php file:
<?php

namespace App\Http\Controllers;

use Illuminate\Http\Request;

use Auth;
use Exception;
use Socialite;
use App\Models\User;

class TwitterController extends Controller
{
    public function loginwithTwitter()
    {
        return Socialite::driver('twitter')->redirect();
    }


    public function cbTwitter()
    {
        try {

            $user = Socialite::driver('twitter')->user();

            $userWhere = User::where('twitter_id', $user->id)->first();

            if($userWhere){

                Auth::login($userWhere);

                return redirect('/home');

            }else{
                $gitUser = User::create([
                    'name' => $user->name,
                    'email' => $user->email,
                    'twitter_id'=> $user->id,
                    'oauth_type'=> 'twitter',
                    'password' => encrypt('admin595959')
                ]);

                Auth::login($gitUser);

                return redirect('/home');
            }

        } catch (Exception $e) {
            dd($e->getMessage());
        }
    }
}
Step 8: Install Laravel Livewire and Jetstream Packages
In this step, you need to run the following commands on terminal to install livewire and jetstream package:
composer require laravel/jetstream
Next, install Jetstream with Livewire:
php artisan jetstream:install livewire
After adding Jetstream, you need to install and build your NPM dependencies and migrate your database:
npm install

npm run dev

php artisan migrate
Step 9: Update Login View
Visit views/auth/ directory and open login.blade.php file, and update the following code into it:
<x-guest-layout>
    <x-jet-authentication-card>
        <x-slot name="logo">
            <x-jet-authentication-card-logo />
        </x-slot>

        <x-jet-validation-errors class="mb-4" />

        @if (session('status'))
        <div class="mb-4 font-medium text-sm text-green-600">
            {{ session('status') }}
        </div>
        @endif

        <form method="POST" action="{{ route('login') }}">
            @csrf

            <div>
                <x-jet-label value="{{ __('Email') }}" />
                <x-jet-input class="block mt-1 w-full" type="email" name="email" :value="old('email')" required
                    autofocus />
            </div>

            <div class="mt-4">
                <x-jet-label value="{{ __('Password') }}" />
                <x-jet-input class="block mt-1 w-full" type="password" name="password" required
                    autocomplete="current-password" />
            </div>

            <div class="block mt-4">
                <label class="flex items-center">
                    <input type="checkbox" class="form-checkbox" name="remember">
                    <span class="ml-2 text-sm text-gray-600">{{ __('Remember me') }}</span>
                </label>
            </div>

            <div class="flex items-center justify-end mt-4">
                @if (Route::has('password.request'))
                <a class="underline text-sm text-gray-600 hover:text-gray-900" href="{{ route('password.request') }}">
                    {{ __('Forgot your password?') }}
                </a>
                @endif

                <x-jet-button class="ml-4">
                    {{ __('Login') }}
                </x-jet-button>
            </div>


            {{-- Laravel Login with Twitter Demo--}}
            <div class="flex items-center justify-end mt-4">
                <a class="btn" href="{{ url('auth/twitter') }}"
                    style="background: #1E9DEA; padding: 10px; width: 100%; text-align: center; display: block; border-radius:4px; color: #ffffff;">
                    Login with Twitter
                </a>
            </div>
        </form>
    </x-jet-authentication-card>
</x-guest-layout>
Step 10: Run Development Server
Now, run the following command to start the development server to run your laravel twitter login app on browser:
php artisan serve
Now you are ready to run this twitter login in laravel. So open your browser and hit following URL on it:
 http://localhost:8000/login

 Or direct hit in your browser

 http://localhost/bloh/public/login
Conclusion
In this tutorial, you learned how to create twitter login app in laravel version 8.
Recommended Laravel Tutorials
If you have any questions or thoughts to share, use the comment form below to reach us.