Laravel 8 Rest API crud with passport auth example; This tutorial will guide you on how to create a restful crud API with passport auth in laravel 8 app, The passport auth usually used to send information that can be trusted and verified using a digital signature.
In RESTful APIs, use the HTTP verbs/methods as actions, and the endpoints are the resources acted upon. will be using the HTTP verbs for their semantic meaning:
GET: retrieve resourcesPOST: create resourcesPUT: update resourcesDELETE: delete resources
Now let’s start building a robust restful API in Laravel 8 app using Passport Authentication. We will also show you a fully functional CRUD for user products using API.
This laravel 8 rest api crud tutorial with passport; will make this kind of API using passport auth:
- Login API
- Register API
- GetUser Info API
- Product List API
- Create Product API
- Edit Product API
- Update Product API
- Delete Product API
Laravel 8 Rest CRUD APIs Tutorial
- Step 1: Download Laravel 8 App
- Step 2: Database Configuration
- Step 3: Install Passport Auth
- Step 4: Passport Configuration
- Step 5: Create Product Table and Model
- Step 5: Run Migration
- Step 6: Create Auth and CRUD APIs Route
- Step 7: Create Passport Auth and CRUD Controller
- Step 8: Test Laravel 8 REST CRUD API with Passport Auth in Postman
Step 1: Download Laravel 8 App
First of all, Open command prompt and run the following command to install laravel 8 app:
composer create-project --prefer-dist laravel/laravel blog
Step 2: Database Configuration
Then, Navigate root directory of your installed laravel restful authentication api with passport tutorial project. And open .env file. Then add the database details as follow:
 DB_CONNECTION=mysql
 DB_HOST=127.0.0.1
 DB_PORT=3306
 DB_DATABASE=here your database name here
 DB_USERNAME=here database username here
 DB_PASSWORD=here database password here
Step 3: Install Passport Auth
In this step, run the below command and install passport package :
composer require laravel/passport
After successfully install laravel passport, register providers. Open config/app.php . and put the bellow code :
  // config/app.php

'providers' =>[
 Laravel\Passport\PassportServiceProvider::class,
 ],
Now, you need to install laravel to generate passport encryption keys. This command will create the encryption keys needed to generate secure access tokens:
php artisan passport:install
Step 4: Passport Configuration
In this step, Navigate to App/Models directory and open User.php file. Then update the following code into User.php:
<?php

namespace App\Models;

use Illuminate\Contracts\Auth\MustVerifyEmail;
use Illuminate\Database\Eloquent\Factories\HasFactory;
use Illuminate\Foundation\Auth\User as Authenticatable;
use Illuminate\Notifications\Notifiable;
use Laravel\Passport\HasApiTokens;

class User extends Authenticatable
{
    use Notifiable, HasApiTokens;

    /**
     * The attributes that are mass assignable.
     *
     * @var array
     */
    protected $fillable = [
        'name', 'email', 'password',
    ];

    /**
     * The attributes that should be hidden for arrays.
     *
     * @var array
     */
    protected $hidden = [
        'password', 'remember_token',
    ];

    /**
     * The attributes that should be cast to native types.
     *
     * @var array
     */
    protected $casts = [
        'email_verified_at' => 'datetime',
    ];
}
Next Register passport routes in App/Providers/AuthServiceProvider.php, Go to App/Providers/AuthServiceProvider.php and update this line => Register Passport::routes(); inside of boot method:
<?php
namespace App\Providers;
use Laravel\Passport\Passport;
use Illuminate\Support\Facades\Gate;
use Illuminate\Foundation\Support\Providers\AuthServiceProvider as ServiceProvider;


class AuthServiceProvider extends ServiceProvider
{
    /**
     * The policy mappings for the application.
     *
     * @var array
     */
    protected $policies = [
        'App\Model' => 'App\Policies\ModelPolicy',
    ];


    /**
     * Register any authentication / authorization services.
     *
     * @return void
     */
    public function boot()
    {
        $this->registerPolicies();
    }
}
Next, Navigate to config/auth.php and open auth.php file. Then Change the API driver to the session to passport. Put this code ‘driver’ => ‘passport’, in API :
     [
         'web' => [
             'driver' => 'session',
             'provider' => 'users',
         ],
         'api' => [
             'driver' => 'passport',
             'provider' => 'users',
         ],
     ],
Step 5: Create Product Table and Model
In this step, open terminal and run the following command to create product model and migration file:
php artisan make:model Product -m
After that, navigate to database/migrations directory and open create_products_table.php file. Then update the following code into it:
<?php


use Illuminate\Support\Facades\Schema;
use Illuminate\Database\Schema\Blueprint;
use Illuminate\Database\Migrations\Migration;


class CreateProductsTable extends Migration
{
    /**
     * Run the migrations.
     *
     * @return void
     */
    public function up()
    {
        Schema::create('products', function (Blueprint $table) {
            $table->bigIncrements('id');
            $table->string('name');
            $table->text('detail');
            $table->timestamps();
        });
    }


    /**
     * Reverse the migrations.
     *
     * @return void
     */
    public function down()
    {
        Schema::dropIfExists('products');
    }
}
Then add fillable property in product.php file, so navigate to app/models directory and open product.php file and update hte following code into it:
<?php

namespace App\Models;

use Illuminate\Database\Eloquent\Factories\HasFactory;
use Illuminate\Database\Eloquent\Model;

class Product extends Model
{
    /**
     * The attributes that are mass assignable.
     *
     * @var array
     */
    protected $fillable = [
        'name', 'detail'
    ];
}
Step 6: Run Migration
In this step, you need to do migration using the bellow command. This command creates tables in the database :
php artisan migrate
Step 6: Create Auth and CRUD APIs Route
In this step, create rest API auth and crud operation routes.
So, navigate to the routes directory and open api.php. Then update the following routes into api.php file:
use App\Http\Controllers\API\PassportAuthController;
use App\Http\Controllers\API\ProductController;

Route::post('register', [PassportAuthController::class, 'register']);
Route::post('login', [PassportAuthController::class, 'login']);

Route::middleware('auth:api')->group(function () {
    Route::get('get-user', [PassportAuthController::class, 'userInfo']);

 Route::resource('products', [ProductController::class]);

});
Step 7: Create Passport Auth and CRUD Controller
In this step, Create a controllers name PassportAuthController and ProductController. Use the below command and create a controller :
 php artisan make:controller Api\PassportAuthController
 php artisan make:controller Api\ProductController
After that, Create some authentication methods in PassportAuthController.php. So navigate to app/http/controllers/API directory and open PassportAuthController.php file. And, update the following methods into your PassportAuthController.php file:
<?php

namespace App\Http\Controllers\API;

use App\Http\Controllers\Controller;

use Illuminate\Http\Request;

use App\Models\User;

class AuthController extends Controller
{
    /**
     * Registration Req
     */
    public function register(Request $request)
    {
        $this->validate($request, [
            'name' => 'required|min:4',
            'email' => 'required|email',
            'password' => 'required|min:8',
        ]);

        $user = User::create([
            'name' => $request->name,
            'email' => $request->email,
            'password' => bcrypt($request->password)
        ]);

        $token = $user->createToken('Laravel8PassportAuth')->accessToken;

        return response()->json(['token' => $token], 200);
    }

    /**
     * Login Req
     */
    public function login(Request $request)
    {
        $data = [
            'email' => $request->email,
            'password' => $request->password
        ];

        if (auth()->attempt($data)) {
            $token = auth()->user()->createToken('Laravel8PassportAuth')->accessToken;
            return response()->json(['token' => $token], 200);
        } else {
            return response()->json(['error' => 'Unauthorised'], 401);
        }
    }

    public function userInfo()
    {

     $user = auth()->user();

     return response()->json(['user' => $user], 200);

    }
}
Next, Create rest api crud methods in ProductController.php. So navigate to app/http/controllers/API directory and open ProductController.php file. And, update the following methods into your ProductController.php file:
<?php

namespace App\Http\Controllers\API;

use App\Http\Controllers\Controller;

use App\Models\Product;

use Illuminate\Http\Request;

use Validator;

class ProductController extends Controller
{
    /**
     * Display a listing of the resource.
     *
     * @return \Illuminate\Http\Response
     */
    public function index()
    {
        $products = Product::all();

        return response()->json([
            "success" => true,
            "message" => "Product List",
            "data" => $products
        ]);
    }
    /**
     * Store a newly created resource in storage.
     *
     * @param  \Illuminate\Http\Request  $request
     * @return \Illuminate\Http\Response
     */
    public function store(Request $request)
    {
        $input = $request->all();

        $validator = Validator::make($input, [
            'name' => 'required',
            'detail' => 'required'
        ]);

        if($validator->fails()){
            return $this->sendError('Validation Error.', $validator->errors());
        }

        $product = Product::create($input);

        return response()->json([
            "success" => true,
            "message" => "Product created successfully.",
            "data" => $product
        ]);

    }

    /**
     * Display the specified resource.
     *
     * @param  int  $id
     * @return \Illuminate\Http\Response
     */
    public function show($id)
    {
        $product = Product::find($id);

        if (is_null($product)) {
            return $this->sendError('Product not found.');
        }

        return response()->json([
            "success" => true,
            "message" => "Product retrieved successfully.",
            "data" => $product
        ]);

    }

    /**
     * Update the specified resource in storage.
     *
     * @param  \Illuminate\Http\Request  $request
     * @param  int  $id
     * @return \Illuminate\Http\Response
     */
    public function update(Request $request, Product $product)
    {
        $input = $request->all();

        $validator = Validator::make($input, [
            'name' => 'required',
            'detail' => 'required'
        ]);

        if($validator->fails()){
            return $this->sendError('Validation Error.', $validator->errors());
        }

        $product->name = $input['name'];
        $product->detail = $input['detail'];
        $product->save();

        return response()->json([
            "success" => true,
            "message" => "Product updated successfully.",
            "data" => $product
        ]);
    }

    /**
     * Remove the specified resource from storage.
     *
     * @param  int  $id
     * @return \Illuminate\Http\Response
     */
    public function destroy(Product $product)
    {
        $product->delete();

        return response()->json([
            "success" => true,
            "message" => "Product deleted successfully.",
            "data" => $product
        ]);
    }
}
Then open command prompt and run the following command to start developement server:
php artisan serve
Step 8: Test Laravel 8 REST CRUD API with Passport Auth in Postman
Now, we will call above create crud and auth apis in postman app:
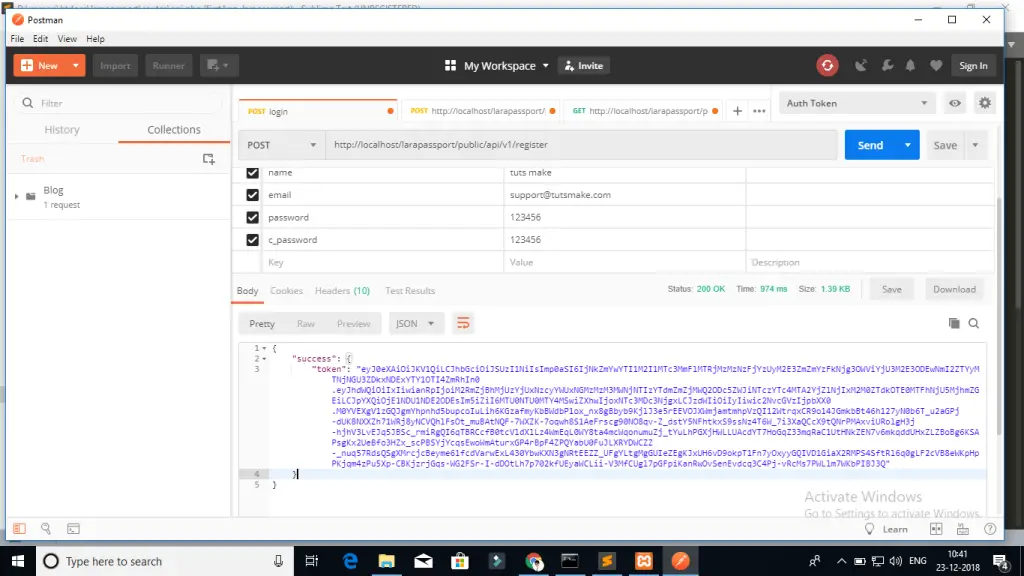
1 – Laravel Register Rest API :
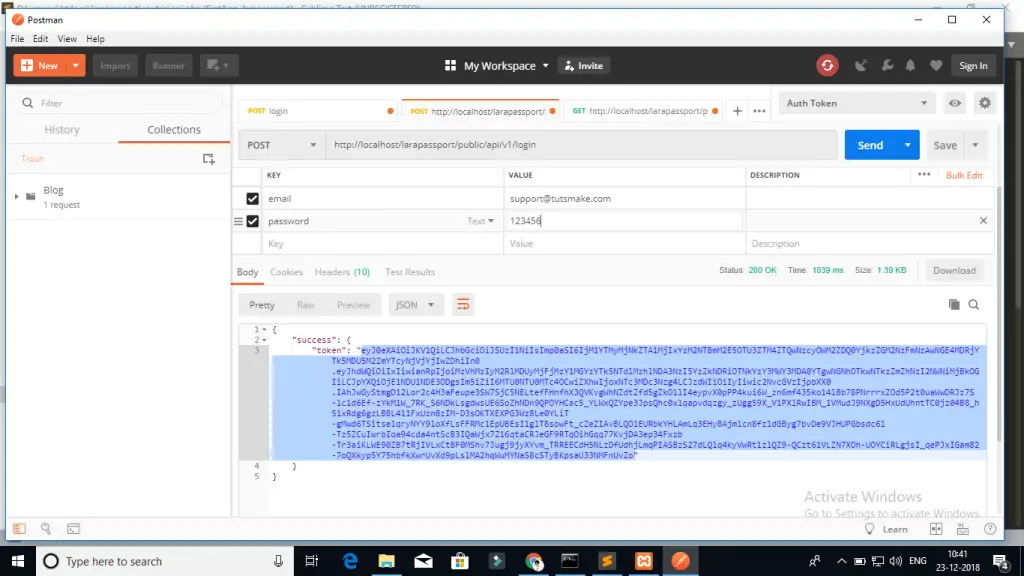
2 – Login API :
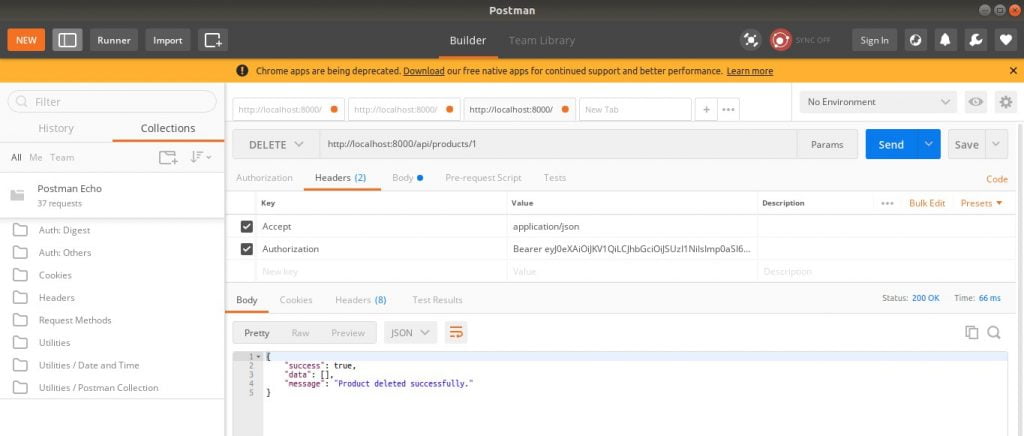
Next Step, you will call getUser, create product, list product, edit product, and delete product APIs, In this apis need to pass the access token as headers:
 ‘headers’ => [
 ‘Accept’ => ‘application/json’,
 ‘Authorization’ => ‘Bearer ‘.$accessToken,

 ]
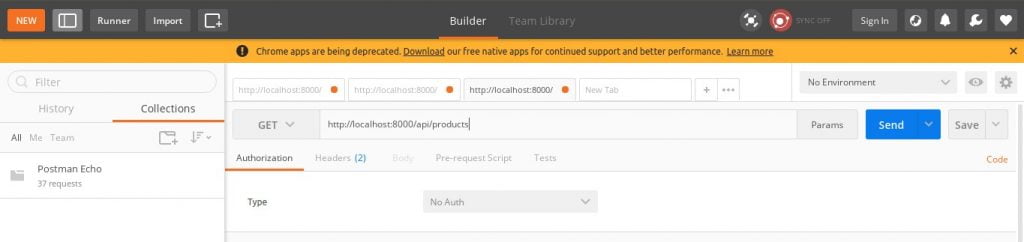
3 – Product List API
- Method:- GET
- URL:- http://127.0.0.1:8000/api/products
4 – Product Create API
- Method:- POST
- URL:- http://127.0.0.1:8000/api/products

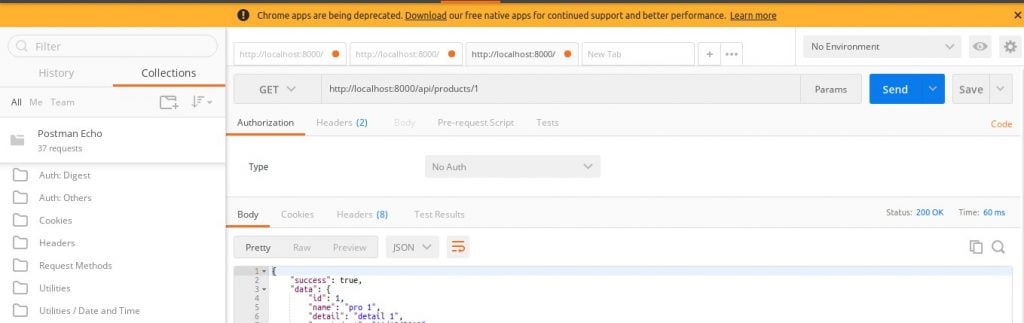
5 – Product Fetch API
- Method:- GET
- URL :- http://127.0.0.1:8000/api/products/{id}
6 – Product Update API
- Method:- PUT
- URL :- http://127.0.0.1:8000/api/products/{id}

7 – Product Delete API
- Method:- DELETE
- URL :- http://127.0.0.1:8000/api/products/{id}
Conclusion
Laravel 8 restful CRUD APIs with passport auth tutorial, you have learned how to build rest CRUD APIs with passport auth in laravel 8 app. And as well as how to call this APIs on postman app.
Recommended Laravel Posts
If you have any questions or thoughts to share, use the comment form below to reach us.
You are the Best….
Really its awesome..can’t tell the words
thanks
and please provide qr code generator for pdf files in laravel