
Laravel 8 dynamically add multiple input fields and submit to database with jquery example; In this tutorial, You will learn how to dynamically add/remove multiple input fields in a form using jQuery, javascript in laravel 8.
Thisadd/remove multiple input fields dynamically with jquery laravel tutorial will guide you from scratch on how dynamically add/remove multiple input fields and submit to database with jquery and laravel 8 app.
How to Dynamically Add or Remove Multiple Input Fields in Laravel 8
- Step 1: Install Laravel 8 App
- Step 2: Connecting App to Database
- Step 3: Build Migration & Model
- Step 4: Add Routes
- Step 5: Create Controller by Artisan
- Step 6: Create Blade View
- Step 7: Run Development Server
- Step 8: Test App On Browser
Step 1: Install Laravel 8 App
First of all, open your terminal and execute the following command to install or download laravel app for making dynamically add/remove multiple input fields and submit to database with jquery and laravel 8 app:
cd xampp\htdocs

Then

composer create-project --prefer-dist laravel/laravel Blog
Step 2: Connecting App to Database
In this step, Navigate to your downloaded root directory and open .env file. Then add your database details in .env file, as follow:
 DB_CONNECTION=mysql
 DB_HOST=127.0.0.1
 DB_PORT=3306
 DB_DATABASE=here your database name here
 DB_USERNAME=here database username here
 DB_PASSWORD=here database password here
Step 3: Build Migration & Model
In this step, open a command prompt and run the following command:
php artisan make:model Todo -m
This command will create one model name Todo.php and as well as one migration file for the Todos table.
Then Navigate to database/migrations folder and open create_todos_table.php. Then update the following code into create_todos_table.php:
    public function up()
    {
        Schema::create('todos', function (Blueprint $table) {
            $table->id();
            $table->string('title');
            $table->timestamps();
        });
    }
Then open Todo.php file and the fillable property, which is placed on app/models directory:
<?php

namespace App\Models;

use Illuminate\Database\Eloquent\Factories\HasFactory;
use Illuminate\Database\Eloquent\Model;

class Todo extends Model
{
    use HasFactory;
    protected $fillable = [
        'title'
    ];
}
After that, run the following command to migrate the table into your select database:
php artisan migrate
Step 4: Create Route
In this step, Navigate to the app/routes folder and open web.php file. Then update the following routes into your web.php file:
 use App\Http\Controllers\DynamicAddRemoveFieldController;

 Route::get('add-remove-multiple-input-fields', [DynamicAddRemoveFieldController::class, 'index']);
 Route::post('add-remove-multiple-input-fields', [DynamicAddRemoveFieldController::class, 'store']);
Step 5: Create Controller by Artisan
In this step, open your terminal and run the following command to create ajax file upload controller file:
php artisan make:controller DynamicAddRemoveFieldController
This command will create a controller named DynamicAddRemoveFieldController.php file.
Next, Navigate to app/http/controllers/ folder and open DynamicAddRemoveFieldController.php. Then add the following file uploading methods into your DynamicAddRemoveFieldController.php file:
<?php
namespace App\Http\Controllers;

use Illuminate\Http\Request;

use App\Models\Todo;

use Illuminate\Support\Facades\Validator;

class DynamicAddRemoveFieldController extends Controller
{
    public function index()
    {
        return view("add-remove-input-fields");
    }
    public function store(Request $request)
    {
        $request->validate([
            'moreFields.*.title' => 'required'
        ]);

        foreach ($request->moreFields as $key => $value) {
            Todo::create($value);
        }

        return back()->with('success', 'Todos Has Been Created Successfully.');
    }

}
Step 6: Create Blade View
In this step, create one blade view file named add-remove-multiple-input-fields.blade.php.
Now, navigate resources/views and create one file name add-remove-multiple-input-fields.blade.php Then update the following code into your add-remove-multiple-input-fields.blade.php file:
<!DOCTYPE html>
<html>
<head>
    <title>Laravel 8 - Add/remove multiple input fields dynamically using Jquery</title>
    <link rel="stylesheet" href="https://stackpath.bootstrapcdn.com/bootstrap/4.5.1/css/bootstrap.min.css">

    <script src="https://code.jquery.com/jquery-3.5.1.min.js"></script>

    <script src="https://stackpath.bootstrapcdn.com/bootstrap/4.5.1/js/bootstrap.min.js"></script>

    <meta name="csrf-token" content="{{ csrf_token() }}">
</head>
<body>

<div class="container">


    <div class="card mt-3">
        <div class="card-header"><h2>Add/remove Multiple Input Todo Fields Dynamically using Jquery In Laravel 8</h2></div>
       <div class="card-body">
            <form action="{{ url('add-remove-multiple-input-fields') }}" method="POST">
                @csrf

                @if ($errors->any())
                    <div class="alert alert-danger">
                        <ul>
                            @foreach ($errors->all() as $error)
                                <li>{{ $error }}</li>
                            @endforeach
                        </ul>
                    </div>
                @endif

                @if (Session::has('success'))
                    <div class="alert alert-success text-center">
                        <a href="#" class="close" data-dismiss="alert" aria-label="close">×</a>
                        <p>{{ Session::get('success') }}</p>
                    </div>
                @endif

                <table class="table table-bordered" id="dynamicAddRemove">
                    <tr>
                        <th>Title</th>
                        <th>Action</th>
                    </tr>
                    <tr>
                        <td><input type="text" name="moreFields[0][title]" placeholder="Enter title" class="form-control" /></td>
                        <td><button type="button" name="add" id="add-btn" class="btn btn-success">Add More</button></td>
                    </tr>
                </table>

                <button type="submit" class="btn btn-success">Save</button>
            </form>
        </div>
    </div>

</div>

<script type="text/javascript">

    var i = 0;

    $("#add-btn").click(function(){

        ++i;

        $("#dynamicAddRemove").append('<tr><td><input type="text" name="moreFields['+i+'][title]" placeholder="Enter title" class="form-control" /></td><td><button type="button" class="btn btn-danger remove-tr">Remove</button></td></tr>');
    });

    $(document).on('click', '.remove-tr', function(){
         $(this).parents('tr').remove();
    });

</script>

</body>
</html>
Step 7: Run Development Server
Finally, run the following command to start the development server for your laravel – dynamically add/ remove multiple input fields using jquery app:
php artisan serve
Step 8: Test App On Browser
Now, open your browser and hit the following URLs into it:
http://localhost:8000/add-remove-multiple-input-fields
If you want to remove public or public/index.php from URL In laravel, Click Me
Conclusion
Laravel 8 dynamically add/remove multiple input fields and submit to database with jquery. In this tutorial, you have learned how to dynamically add or remove multiple input fields using jquery , javascript in laravel 8 app.
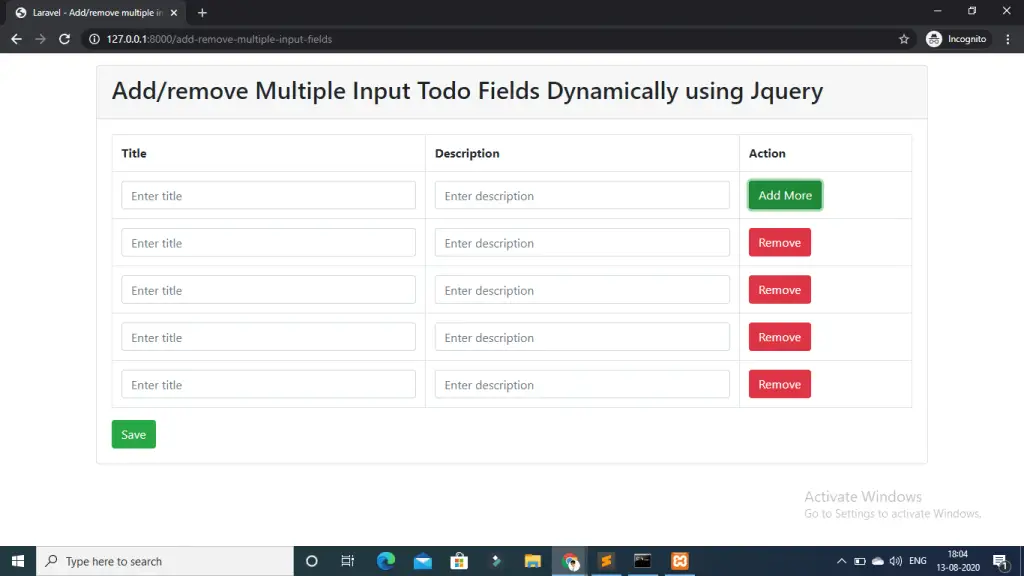
Add/remove multiple input fields dynamically with jquery laravel 8 app will looks like, you can see in the following image:
Recommended Laravel Posts
If you have any questions or thoughts to share, use the comment form below to reach us.