In this guide, we will teach you how to develop a shopping add an item to the cart using jQuery ajax and session in laravel 11 application.
In this Laravel add to cart example guide, we will create a movie e-commerce page with add to cart functionality using Session and jQuery AJAX in Laravel 11 applications, allowing users to add a movie to a cart. We will use jQuery AJAX to add items to the cart without refreshing the page and will use session to store cart information in a variable.
Laravel 11 Add Item to Shopping Cart Example Tutorial
Here are steps:
Step 1: Download the New Laravel Application
Run composer create-project --prefer-dist laravel/laravel ShoppingCart command on cmd to download and setup new laravel application into your system:
composer create-project --prefer-dist laravel/laravel ShoppingCart
Step 2: Initialize Database to Application
Open .env file from root folder of laravel project, and configure database details into it; something like this:
DB_CONNECTION=mysql
DB_HOST=127.0.0.1
DB_PORT=3306
DB_DATABASE=your_db_name
DB_USERNAME=your_db_user
DB_PASSWORD=your_db_pass
Step 3: Create Model and Migration File
Run the php artisan make:model Movie -m command on cmd to create model and migration file;
php artisan make:model Movie -mNow, open movie.php model from app/models folder and add the fillable property into it; something like this:
class Movie extends Model
{
    use HasFactory;

        protected $fillable = [
        'name',
        'director',
        'poster',
        'price'
    ];
}
And add fields in database/migration/create_movies_table.php migration file, which you want to create in a database table; something like this:
    public function up(): void
    {
        Schema::create('movies', function (Blueprint $table) {
            $table->id();
            $table->string("name", 255)->nullable();
            $table->text("director")->nullable();
            $table->string("poster", 255)->nullable();
            $table->decimal("price", 6, 2);
            $table->timestamps();
        });
    }
Now run php artisan migrate command to create tables into your configured database with laravel application:
php artisan migrate
Step 4: Add Records to the Database
Add records to the database using seeder, simply run php artisan make:seed MovieSeeder command on cmd to create seeder file:
php artisan make:seed MovieSeeder
Open MovieSeeder.php file from database/seeders folder, and add the following code into it; something like this:
    public function run(): void
    {
       $Movies = [
            [
                'name' => 'Hancock',
                'director' => 'Peter Berg',
                'poster' => 'https://assets-in.bmscdn.com/iedb/movies/images/extra/vertical_logo/mobile/thumbnail/xxlarge/hancock-et00000995-10-03-2021-03-48-47.jpg',
                'price' => 299
            ],
            [
                'name' => 'Article 370',
                'director' => 'Aditya Suhas',
                'poster' => 'https://assets-in.bmscdn.com/iedb/movies/images/mobile/thumbnail/xlarge/article-370-et00384444-1708669471.jpg',
                'price' => 500
            ],
            [
                'name' => 'Yuva',
                'director' => 'Yuva Rajkumar',
                'poster' => 'https://assets-in.bmscdn.com/iedb/movies/images/mobile/thumbnail/xlarge/yuva-et00387718-1708087150.jpg',
                'price' => 1000
            ],
            [
                'name' => 'Over Water S1',
                'director' => 'John',
                'poster' => 'https://assets-in.bmscdn.com/iedb/movies/images/extra/vertical_logo/mobile/thumbnail/xxlarge/over-water-s1-et00359269-1683705409.jpg',
                'price' => 699
            ],
            [
                'name' => 'Star Trek',
                'director' => 'J. J. Abrams',
                'poster' => 'https://assets-in.bmscdn.com/iedb/movies/images/extra/vertical_logo/mobile/thumbnail/xxlarge/star-trek-et00003082-14-05-2021-11-30-13.jpg',
                'price' => 649
            ]
        ];
        foreach ($Movies as $key => $value) {
            Movie::create($value);
        }
    }
Run the php artisan db:seed --class=MovieSeeder command to add data or records in database:
php artisan db:seed --class=MovieSeeder
Step 5: Create Controller File
Now, you need to create a new controller file that is used to handle add-to-cart functionality by running the following command:
php artisan make:controller MovieControllerOpen MovieController.php
<?php
namespace App\Http\Controllers;
use Illuminate\Http\Request;
use App\Models\Movie;

class MovieController extends Controller
{
    public function index()
    {
        $movies = Movie::all();
        return view('movies', compact('movies'));
    }

    public function movieCart()
    {
        return view('cart');
    }

    public function addMovieToCart(Request $request)
    {
        $movieId = $request->input('product_id');
        $quantity = $request->input('quantity', 1);
        $cartItemId = $request->input('cart_item_id');

        $movie = Movie::find($movieId);

        if (!$movie) {
            return response()->json(['error' => 'Movie not found'], 404);
        }

        $cart = session()->get('cart', []);

        if (isset($cart[$movieId])) {
            // Update quantity if product is already in the cart
            $cart[$movieId]['quantity'] += $quantity;
        } else {
            // Add new item to the cart
            $cart[$movieId] = [
                'id' => $movie->id,
                'name' => $movie->name,
                'price' => $movie->price,
                'quantity' => $quantity,
                "poster" => $movie->poster
            ];
        }

        session()->put('cart', $cart);

        // Calculate the total quantity
        $totalQuantity = 0;
        foreach ($cart as $item) {
            $totalQuantity += $item['quantity'];
        }
        return response()->json(['message' => 'Cart updated', 'cartCount' => $totalQuantity], 200);
    }


    public function deleteItem(Request $request)
    {
        if($request->id) {
            $cart = session()->get('cart');
            if(isset($cart[$request->id])) {
                unset($cart[$request->id]);
                session()->put('cart', $cart);
            }
            session()->flash('success', 'Movie successfully deleted.');
        }
    }
}
Step 6: Create Routes
Open web.php file from the routes folder, and create routes in it to handle requests between controller and view file; something like this:
use App\Http\Controllers\MovieController;

Route::get('/movies-list', [MovieController::class, 'index']);
Route::get('/cart-list', [MovieController::class, 'movieCart']);
Route::post('add-to-cart', [MovieController::class, 'addMovieToCart'])->name('add-movie-to-shopping-cart');
Route::delete('/delete-cart-item', [MovieController::class, 'deleteItem'])->name('delete.cart.item');
Step 7: Create Views
Now you need to create some views files to manage add to cart functionality using jQuery ajax and session.
Go to resources/views/ folder and create main.blade.php file, and add the following code into it, which is used to display cart count on all pages:
<!DOCTYPE html>
<html>
<head>
    <title>Laravel 11 Shopping Cart Example - Tutsmake.com</title>
    <link href="https://cdn.jsdelivr.net/npm/[email protected]/dist/css/bootstrap.min.css" rel="stylesheet">
    <script src="https://code.jquery.com/jquery-3.6.1.min.js"></script>
</head>
<body>

<div class="container mt-5">
    <h2 class="mb-3">Laravel 11 Shopping Add To Cart Example - Tutsmake.com</h2>

    @php
    $totalQuantity = 0;
    @endphp

    @if(session('cart'))
    @foreach(session('cart') as $item)
        @php
        $totalQuantity += $item['quantity'];
        @endphp
    @endforeach
    @endif

    <div class="col-12">
        <div class="dropdown" >
            <a class="btn btn-outline-dark" href="{{ url('cart-list') }}">
               <i class="fa fa-shopping-cart" aria-hidden="true"></i> Cart <span class="badge text-bg-danger" id="cart-quantity">{{ $totalQuantity }}</span>
            </a>
        </div>
    </div>
</div>

<div class="container mt-4">
    @if(session('success'))
        <div class="alert alert-success">
          {{ session('success') }}
        </div>
    @endif
    @yield('content')
</div>

@yield('scripts')
</body>
</html>
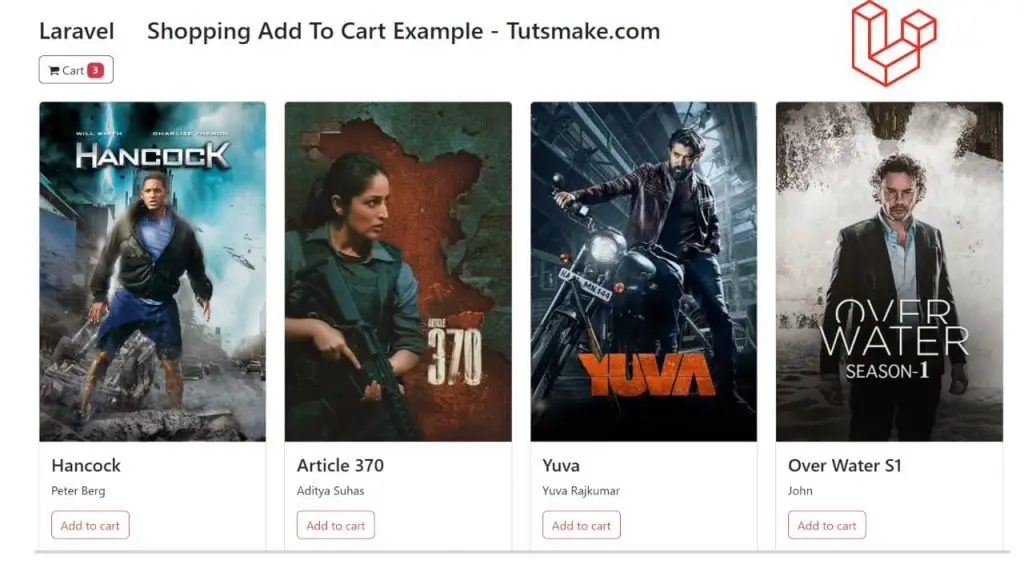
Now, create movies.blade.php file and add the following code into it that is used to display item or product in list for add to cart:
@extends('main')

@section('content')

<div class="row">
    @foreach($movies as $movie)
        <div class="col-md-3 col-6 mb-4">
            <div class="card">
                <img src="{{ $movie->poster }}" alt="{{ $movie->name }}" class="card-img-top">
                <div class="card-body">
                    <h4 class="card-title">{{ $movie->name }}</h4>
                    <p>{{ $movie->director }}</p>
                    <input type="hidden" class="product-quantity" value="1">
    <p class="btn-holder"><button class="btn btn-outline-danger add-to-cart" data-product-id="{{ $movie->id }}">Add to cart</button></p>
                </div>
            </div>
        </div>
    @endforeach
</div>
@endsection

@section('scripts')

<script type="text/javascript">
    $(".add-to-cart").click(function (e) {
        e.preventDefault();

        var productId = $(this).data("product-id");
        var productQuantity = $(this).siblings(".product-quantity").val();
        var cartItemId = $(this).data("cart-item-id");

        $.ajax({
            url: "{{ route('add-movie-to-shopping-cart') }}",
            method: "POST",
            data: {
                _token: '{{ csrf_token() }}',
                product_id: productId,
                quantity: productQuantity,
                cart_item_id: cartItemId
            },
            success: function (response) {
                $('#cart-quantity').text(response.cartCount);
                 alert('Cart Updated');
                console.log(response);
            },
            error: function (xhr, status, error) {
                // Handle errors (e.g., display an error message)
                console.error(xhr.responseText);
            }
        });
    });
</script>


@endsection
Now, create cart.blade.php file and add the following code into it that is used to display item or product with price, total and subtotal in list:
@extends('main')

@section('content')
<table id="cart" class="table table-bordered">
    <thead>
        <tr>
            <th>Product</th>
            <th>Price</th>
            <th>Total</th>
            <th></th>
        </tr>
    </thead>
    <tbody>
        @php $total = 0 @endphp
        @if(session('cart'))
            @foreach(session('cart') as $id => $item)

                <tr rowId="{{ $id }}">
                    <td data-th="Product">
                        <div class="row">
                            <div class="col-sm-3 hidden-xs"><img src="{{ isset($item['poster']) ? $item['poster'] : 'N/A' }}" class="card-img-top"/></div>
                            <div class="col-sm-9">
                                <h4 class="nomargin">{{ $item['name'] }}</h4>
                            </div>
                        </div>
                    </td>
                    <td data-th="Price">${{ $item['price'] }}</td>

                    <td data-th="Subtotal" class="text-center">${{ $item['price'] * $item['quantity'] }}</td>
                    <td class="actions">
                        <a class="btn btn-outline-danger btn-sm delete-item">Delete</a>
                    </td>
                </tr>
            @endforeach
        @endif
    </tbody>
    <tfoot>
        <tr>
            <td colspan="5" class="text-right">
                <a href="{{ url('/movies-list') }}" class="btn btn-primary"><i class="fa fa-angle-left"></i> Continue Shopping</a>
                <button class="btn btn-danger">Checkout</button>
            </td>
        </tr>
    </tfoot>
</table>
@endsection

@section('scripts')
<script type="text/javascript">

    $(".delete-item").click(function (e) {
        e.preventDefault();

        var ele = $(this);

        if(confirm("Do you really want to delete?")) {
            $.ajax({
                url: '{{ route('delete.cart.item') }}',
                method: "DELETE",
                data: {
                    _token: '{{ csrf_token() }}',
                    id: ele.parents("tr").attr("rowId")
                },
                success: function (response) {
                    window.location.reload();
                }
            });
        }
    });

</script>
@endsection
Step 8: Run and Test Application
Run php artisan serve command on cmd to start application server:
php artisan serve
Ready to run this app at http://127.0.0.1:8000/movies-list URL on browser:
http://127.0.0.1:8000/movies-list
Conclusion
We hope with the help of Laravel Add item to shopping cart example guide, you have learned how to create add to cart functionality in Laravel 11 application using jQuery ajax and session.
Here are some new guides related to Laravel 11; You must check them out: